Left 4 Dead 2

Left 4 Dead 2

858 ratings
Custom Survivor Replacement
By Splinks and 2 collaborators
Welcome Masses!

If you're here clueless let me fill you in. On this page you will be educated on how to do a model replacement for L4D2 survivors. This tutorial will have the steps you need to know how to set up, start, finish a custom survivor replacement.


If you're running into issues feel free to leave a comment on this page
or join the Dead4Mods Discord locacted at
https://discord.gg/4qtmzBP


For those that would like a VIDEO alternative to making a survivor mod please give SFM TURK's tutorial series a look
https://www.youtube.com/watch?v=O8VmA1tYpUQ&list=PLc10aNZGuuqMd9nVg0MsW8a31GBX4cABc
2
5
   
Award
Favorite
Favorited
Unfavorite
Setting Up
Ok, so let’s start with the basics. You are obviously going to need to have Steam installed as well as Left 4 Dead 2. In addition to this I like to have these other things installed too: Left 4 Dead 2 Authoring Tools and the Source SDK. You can install those by right clicking the Steam icon, selecting Library, then from the Library panel click just to the right of Search and select Tools(this will display all the available tools in case you are not showing them by default).

Now right click on each item you want (Left 4 Dead 2 Authoring Tools and Source SDK) and choose Install Game. Follow the on-screen prompts and allow each to install fully. While you do that, ima go get a doughnut (because doughnuts are awesome). I will meet you back here when you’re done.

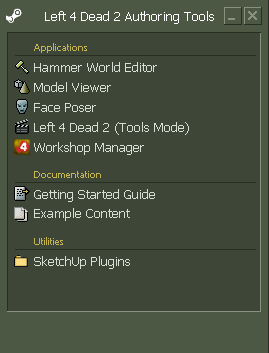
Ok, so now we’re back, drunk on doughnuts and we have the basic components set up. Let’s start each program once now so they can do their initial setup things that they like to do. If you didn’t have shortcuts created you can right click the Steam icon and start them from there or go back into your games library and start them that way too. Let’s start with the Authoring Tools…It should start up without any questions. You will see on your basic screen something like this:


Note that you now have Face Poser and Model Viewer installed too. That’s not all that important to you right now, but later on it probably will be so just take my word that it’s a good thing.
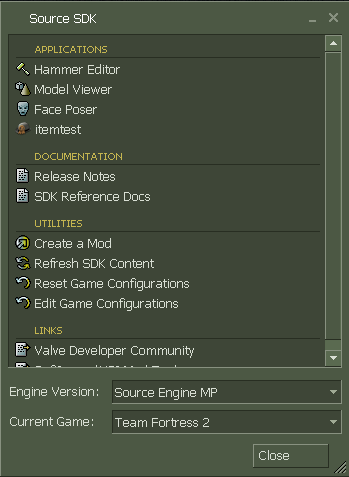
Now, let’s close this out and start up the Source SDK. On first start you should get a “copying files please wait…” box come up, so just be patient for a bit while it does its thing. Once it’s done it will probably open a browser window with some release note we don’t really care about, so let’s close that crap out…now we should see something very similar to the Authoring Tools…it should look something like this:


Please note that the model viewer and face poser in the source sdk are not *exactly* the same as those in the Authoring Tools. That’s another one of those things you’ll care more about later on. For now, just make a mental note of it. Ok, now that we know everything is installed and working properly, let’s move on.
Dealing with Models
Ok, so if we want to do mods then we need to be able to deal with the models and the various formats they come in. We also need to get them in and out of our game. So, let’s start by extracting Ellis from Left 4 Dead 2.

First thing we will need is a program called GCFScape.
Here is the link to the download: http://nemesis.thewavelength.net/files/files/gcfscape183.exe

Yes, I know it’s an exe file, but it’s not a virus, I promise. If you don’t trust me you can go Google the bloody link yourself Captain Paranoia. Run the installer and let the program install with all the default options(it’s easier for everyone if we all do things the same way and put them in the same place, so don’t come crying to me when something doesn’t work because you wanted to be cute and install it in the “FudgePuddles” folder on your computer).

Once it’s installed you can run it by going to Start->All Programs->Nem’s Tools->GCFScape.
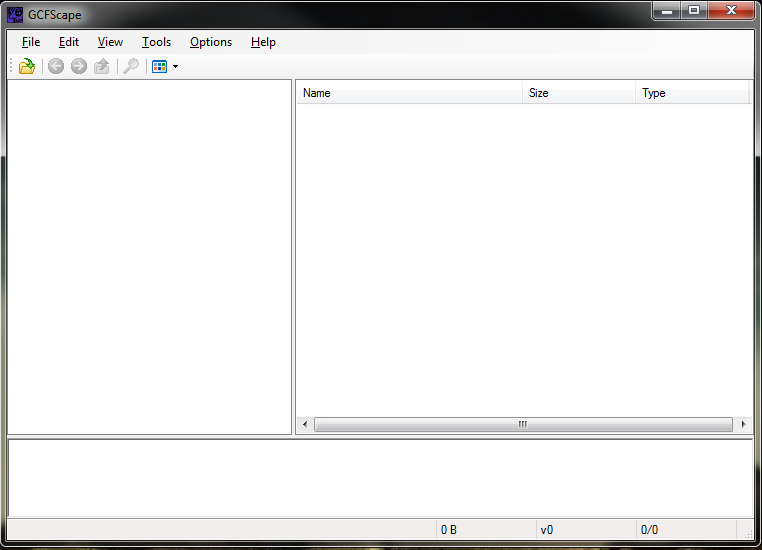
You should see something like this:


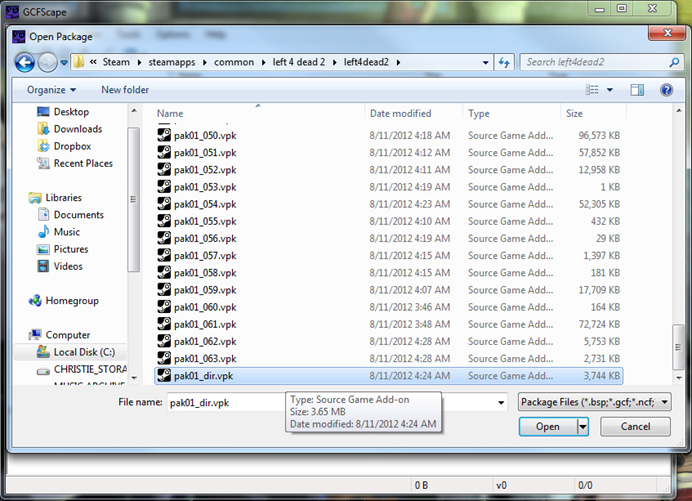
Ok, let’s go catch us a redneck! Go to the File->Open or click the folder icon in the top left. We need to browse to the VPK folder that Left 4 Dead 2 keeps the survivor models inside(think of VPK files kind of like ZIP files).

The location of this file is as follows:
C:\Program Files\Steam\steamapps\common\left4dead2\left4dead2\pak01_dir.vpk
You can see it in the pic below


So select the file and hit OK and you should get this:


This is all the stuff that’s contained inside that VPK file. Here you can find all sorts of goodies from models to maps and textures to scripts and so on. It is here that we’ll be grabbing Ellis. This is also important because it shows you the correct structure for making your own VPK addons later. We’ll get into that later, just note that if you ever have a question about the proper folder structure, check back here to see the correct structure.

Moving on…In the left side pane, click the plus sign next to models, then scroll down and click the plus sign next to survivors. In the right hand pane you should now see a bunch of files. If you scroll down in the right pane you should see some called “survivor_mechanic.” That’s our redneck and those are the model files we are after.
  • 1st off let’s highlight all those files in the right hand pane(so you’ll be highlighting all 5 mechanic files).
  • 2nd right click on them and choose Extract. It will ask you where you want to put them. Let’s start good habits early and put them in a proper place…so click Desktop
  • 3rd click on Make New Folder. Name the new folder “survivor_ellis” and then highlight it.
  • 4th click the Make New Folder button again and name this folder “models”.
  • 5th highlight the models folder and once more click Make New Folder. Name this one “survivors”.
  • 6th highlight that folder and click OK.
What we just did was to re-create a similar folder structure to what we see in the VPK. So, since the files are in the models\survivors\ folder in the VPK we put them in the same place in our folder. Make sense? Well too bad cause I don’t know a better way to explain it. Here is a pic of the extracted files in our folder structure:


Now, for the sake of completion, let’s grab Ellis’s main texture files.
  • Go back to GCFScape, and this time we’re going to click the plus sign next to materials.
  • Then next to models.
  • Then next to survivors.
  • In the right pane you’ll now see a few folder. Highlight the one called mechanic and right click on it then choose extract.
  • Once more it will ask you a location and once more we will mimic the actual location.
  • So we will save in: survivor_ellis\materials\models\survivors (inside that survivors folder will be the mechanic folder with all the files inside it).
  • Now we have all the models and textures for Ellis that we need.
  • Close GCFScape.
Decompiling
Now that we have all the model files, we are going to need to convert them into a format we can work with. That means we will need to decompile them. Specifically we will decompile the survivor_mechanic.mdl file as this one contains the actual mesh data we need.

======
ZeqMacaw here, just for this section. Splinks has allowed me to interrupt to tell you the following. Instead of all this nonsense we modders had to go through to use MDL Decompiler, we can now use a brilliant tool called Crowbar. I won't go into details on how to use it here because it's fairly easy, and if you really want some help on it, here is a helpful link to the main Crowbar guide: http://steamcommunity.com/sharedfiles/filedetails/?id=791755353
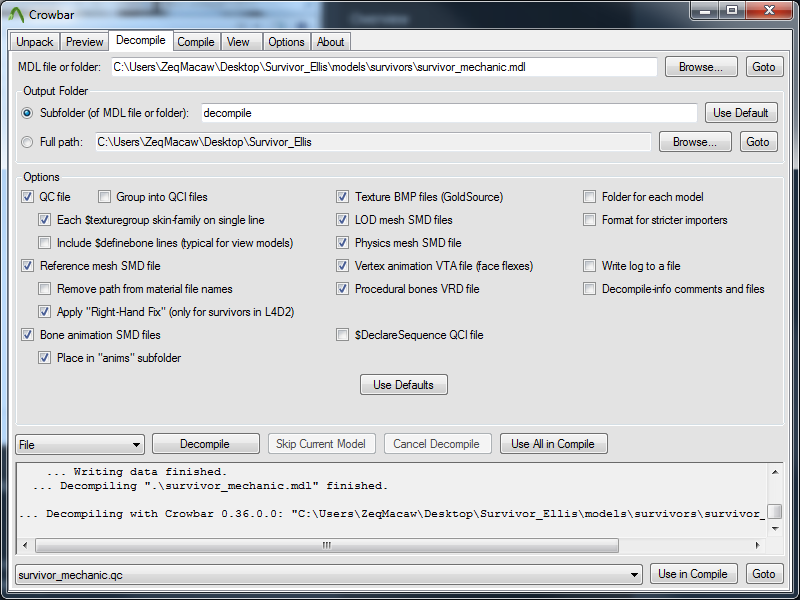
Here is a screenshot of what your Crowbar should look like when decompiling the Ellis model:

======

Working with the Decompiled Files
======
ZeqMacaw here again. I have updated some of the screenshots, some file names, and some of the wording to better reflect the use of Crowbar in this section.
======

You can keep Crowbar open, because we'll be using it later. Now open up our survivor_ellis folder and go to the models\survivors\decompile folder. You should see something like this:


Those are all our decompiled files for the Ellis model.

SMD files are the actual mesh data.

The ones that say lod1, lod2, lod3 at the end are for more advanced things(like how detailed the model will be at certain distances-games do this to save on memory.
    After all if the character is so far away you can see the detail, then it’s pointless to use a mesh that has all that detail on it. So they might use a lower poly mesh for further away and a higher poly mesh for closer distances.). You don’t need to worry about these for right now. Later on, when you’re really good at the basics you can come back and play with those.

Next we have the survivor_mechanic.qc file-this is the compile sheet. It tells the compiler program how to build the MDL file.
    We will edit this later in Notepad++ to make our mod, but always keep a backup of the untouched original file just in case.

The VTA file is for facial anims.
    And such-that’s another advanced topic we’re not going to cover right now because it’s beyond the scope of what we’re trying to accomplish here. Just know that’s what it is for and that, generally speaking, the VTA you get from decompiling is corrupt anyways so it’s probably worthless to you regardless(although there are ways to get good ones, but again, that’s way beyond the scope of what we’re doing here so once more just make a mental note of it).

Ok, the survivor_mechanic_physics.smd is the physics mesh and the survivor_mechanic_anims/ragdoll.smd is the ragdoll animation.
    And we’re going to want to keep backups of those handy too (often I will change the physics mesh, but you’ll probably never change the ragdoll unless you’re a glutton for punishment hehe).

Finally that leaves us with survivor_mechanic_reference.smd which is our Holy Grail. That’s the main survivor mesh data that we will use as the foundation for our Ellis mods. So let’s get that mother*&^ loaded up and see what we’re dealing with.
======
ZeqMacaw's NOTE: The reference SMD file might NOT have "reference" in the name, due to Crowbar changing how it names decompiled files. Just notice that the biggest SMD file is likely the main mesh file you want. Do not get hung up by the different name. You can find out exactly which one is the main mesh file by looking in the QC file; for the survivor models, it should be the SMD file name indicated in a line like this:
$Model "Mechanic" "survivor_mechanic_reference.smd" {
OR, probably more like this:
$model "Mechanic" "survivor_mechanic_mechanic_model_merged.smd" {
======
Loading the Model in 3DSMax
I know, I know…3DSMAX isn’t free. But it’s what I use and what I know so it’s what I’m teaching you.

You can download a free 30-day trial from Autodesk or if you're A student you can have a full Student version which is capable of doing these mods if this is all you plan on using this program for

NOTE however that I have been told the import and export plugins no longer work in 3dsmax 2013(the current version) so you will probably need to locate and install an older version(I use version 2010). Unfortunately I do not know how to tell you to locate an older version of the demo so you’re on your own for that. I’m really sorry about that, truly I am. I did a little quick Google search and I was able to locate a download for the 2012 demo, which they do have plugins for, so I would say just be resourceful and you should probably manage. I can’t offer any direct links for legal reasons I’m afraid. Anyways, get it and install it then we’ll move on from there.
Ok, so now that we’ve wasted 20-30 minutes on all that crap, we should now have 3dsmax installed finally. Let’s start it up once real quick just to have a look around…It should look a lot like this:


Hit close on the opening dialogue box(if you get it) then click the green box in the upper left…you will see your basic functions like loading files and such there. They wanted to be cute and make it like their own little start button instead of just calling it the file menu like a normal person but whatever…moving on. Let’s exit out of 3dsmax because we’re going to need a couple of plugins before we can load our smd file. SMD files are not native to 3dsmax, so in order to use them we will need to download some SMD import\export filters to give 3dsmax that functionality. You can find the import filter here:
http://www.wunderboy.org/download.php?file=3dsmax_smd_importer_v1.0.zip&s=2 and the export filter here: http://www.wunderboy.org/download.php?file=3dsmax_smd_exporter_v1.6.zip&s=2
Download those files somewhere convenient and we’ll start with the import filter. Extract the files from the ZIP. Now go into the Max 2012 folder then into the 32 or 64 bit folder depending on the version of 3dsmax you installed. Let’s assume you’re using the 32-bit version for now. So go into the 32-bit folder and copy the file SMDImporter.dli. Now browse to this folder:
C:\Program Files\Autodesk\3ds Max 2012\plugins\
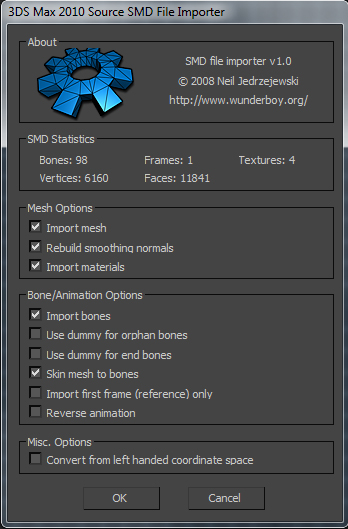
Now paste your file there. Do the same thing for the SMD export plugin. Now restart 3dsmax and let’s get that damn smd loaded(finally). Once 3dsmax loads up, click their little green box in the upper left then select Import. At the bottom of the window that comes up, where it says “Files of type” make sure you have All Formats selected then browse to your decompile folder and select survivor_mechanic_reference.smd and click Open. The Pre-Parse Options come up-just hit OK. The main import filter options come next…check the boxes as shown below and hit OK.

Finally, after the model loads you get one last dialogue box. Just hit OK there too. If you get any texture errors or warning just ignore them for now and click OK or whatever to get past them(doubt you’ll see any at this point though). BINGO! We now have our Ellis mesh loaded into 3dsmax. Well, that took some effort didn’t it. Don’t worry, it always seems bad the first few times. Once you get the hang of it it won’t take you any longer than about 10 minutes to get the file from the game into 3dsmax. Anyways, now we want to save this file as a template or base file for us to always use in the future to build Ellis mods. So let’s click on the green button and choose “Save As” and let’s name this one Ellis_BASE and click OK. We now saved our default Ellis as a 3dsmax file so we’ll have easy access to him in the future. Cool!
Finding a Model to Port
At this point you could add or remove elements from the mesh if you wanted. To do that you would probably need to familiarize yourself both with basic concepts of 3d modeling and 3dsmax usage as well. For the sake of this tutorial we’re not going to cross that bridge just yet. What we’re going to so is port a model from another game because it’s a little easier, in principle, to deal with for now. Where you get the model doesn’t really matter ultimately…basically any format 3dsmax can read is OK. There are LOTS of free model sites out there that will let you download models already in a format 3dsmax can read.

Here's a few selected sites.
  • http://tf3dm.com/new/all
    This is a decent one just because it has a lot of models already in 3dsmax friendly formats and it tells you the format it’s in on the thumbnail so it’s easy to see what will work for you.

  • http://www.models-resource.com/
    Full of old school game models and a few slightly newer ones. Also organizes models from what game and platform they came from for easy navigation.

  • XNALara Community[xnalara.home-forum.com]
    This Community is full of models and has a great set of folks that has made more rips then a fat man in skinny jeans. Also they have alot of custom content made by dedicated fans as well.

    To find models just google "Xnalara models" or visit two of the following sites
    xnalara customized[xnalara-customized.deviantart.com]
    tombraiderforums[www.tombraiderforums.com]

    These models must be extracted with a specific program/s tho.
    XNALARA: Link[www.tombraiderforums.com]
    XNALARA XPS: Link[xnalara.home-forum.com]

  • http://garrysmod.org
    Another good resource, but requires that you actually own Garry’s Mod and log in through steam to prove it.

So for now we’ll just go with the first site to keep things simple. So, looking down the main page I see Spider-Man. Done and Done. I’m a spidey fan, it’s a relatively easy model to work with cause there isn’t a lot of detail, and it’s in OBJ file format, which 3dsmax can read. All that = WIN. You can do your dream model later when you know how, but for now, just trust me and let’s work with spidey. So click the Download button beneath the pic, then download the file from the Mediafire link provided. Put it somewhere you can find it easy. Ok, good to go.

Spiderman Model:
http://thefree3dmodels.com/stuff/characters/spiderman/14-1-0-2157
Importing Spidey into 3dsmax
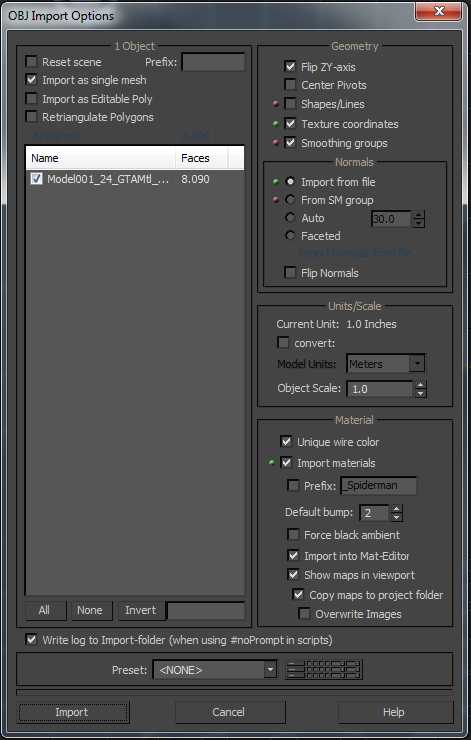
Back in 3dsmax, let’s start a new document by clicking the New Scene icon right next to the green button. Select New All on the options panel and then click OK to load a new scene. Go to where you downloaded Spidey and extract the RAR file you downloaded. You should get a new folder with 6 files. The 3 TGA files are your textures, and the OBJ is your mesh. In 3dsmax click the green button, select Import, then select your spiderman.obj file and click OK to open. You can see my import settings in the following pic:


Match up with my settings then click the Import button to load up spidey. You’ll probably get a texture warning or material warning-just ignore it and continue. Whoopee!! Spidey is loaded into 3dsmax! So let’s click the green button, Save As and save our file as Spidey.max. Ok…moving on.
Checking the Textures in 3dsmax
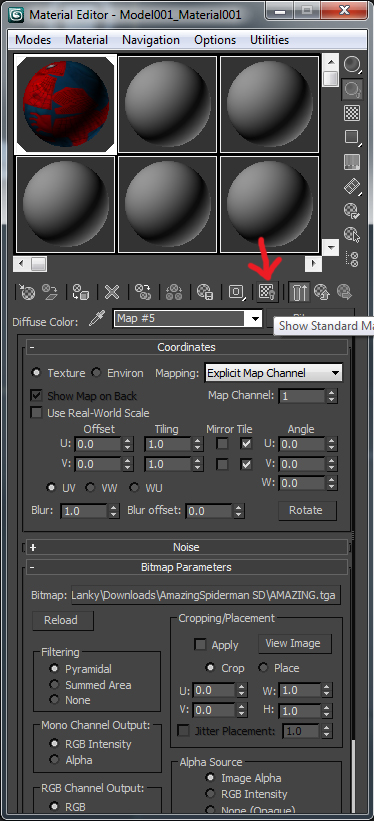
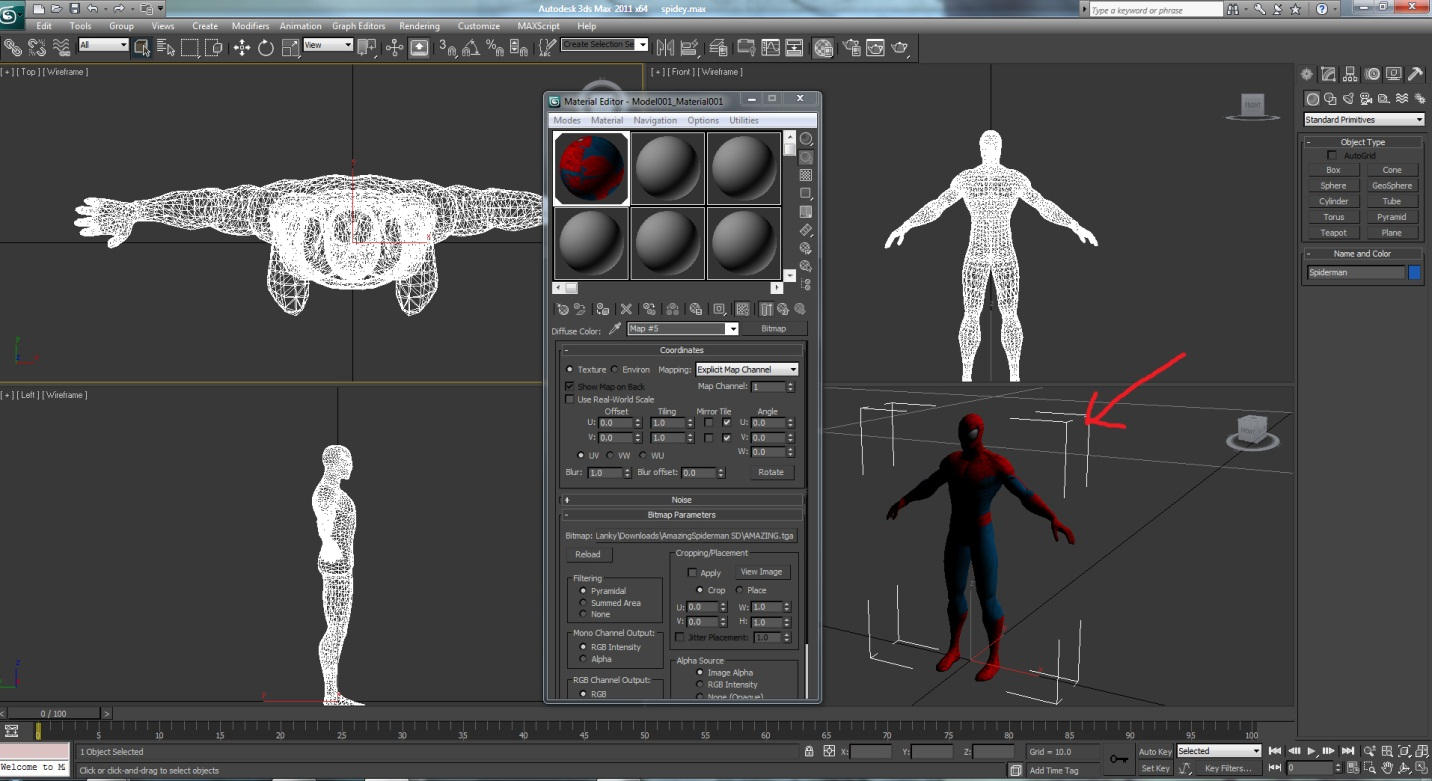
Before we go too much further we should probably go ahead and check the textures in max while we still have a good deal of control over them. Once you’ve exported you file and compiled you’ll have to do a lot of backtracking to fix bad filenames on textures(mostly happens with foreign language models like Japanese ones) and other random issues. We’re going to attempt to nip that in the bus right here. Click on the Material Editor button to bring up the Material Editor panel as shown:


Under the 6 squares where you see Model001_Material001 in this pic, click the eye dropper tool just to the left then click on the spidey model. This ensures we have the texture for spidey loaded into Material Editor and not some other random material we were working on last time or something. You’ll recall we had 3 texture files. AMAZING.tga is the actual texture file with all the colors and such. That is the file we’re going to load in 3dsmax. dirt_null.tga is a dirt texture which we will not be using at all. In 3d it’s common practice to use dirt textures to add a note of realism to textures so they don’t look so polished and perfect. There are ways we can do that to, but we don’t need to do it in max since we’re just porting the model. The norm_null.tga is the normal map. This is a texture that creates creases or surface to an object. For example, if you wanted to add raised area to the model but didn’t want to model it, you could use a normal map to raise the area. In L4D2 these are used a lot for making the wrinkles in clothes. We are going to use this one, but not in 3dsmax. Again, we’re just porting the model and 3dsmax is just a pit stop on our way to doing that, so there’s no need to go all out and try to load and tweak everything.
Back in Materials Editor panel click the Maps button then check the box next to Diffuse Color. Now click on the button to the right of Diffuse Color where it says None. On the panel that opens, select Bitmap then browse to the AMAZING.tga in the spidey folder, select it and click Open. You should see the sphere on the top left turn red and blue to indicate we have the texture loaded. That’s what we want to see. Now click the Show Standard Map in viewport button as shown here:


And you should see the texture appear on Spidey in the viewport window as shown:


That’s perfect. No issues. Save the file. Time to get to the dirty work…
Merging Models
So we now have our Ellis and Spidey files saved as native max files and we have verified that all is well with our Spidey textures. That means we are now ready to start rigging Spidey. So let’s make a New Document as we did before choosing New All. Now let’s go to green button->Open and select our Ellis max file. Ignore any texture warning and load him up. Now let’s click on green button->Import->Merge and select our Spidey max file. In the box that opens select Spiderman in the left pane then hit OK. Note that sometimes the model you load will have its own bones, camera, etc. in the file and all those things will show up in the left pane. We need nothing but the base mesh, so on the right you can uncheck basically everything except Geometry so you’ll only see the mesh object you need. Sometimes you will have more than one mesh, in which case you should select them all. Click OK to continue and you will see a tiny white spec appear at Ellis’s feet. Our spidey model is WAAY smaller than Ellis so we’ll have to fix that. But anyways we have the files merged together now so it’s a good time to save…let’s call this one Ellis_Spidey or something catchy like that.
Matching Models
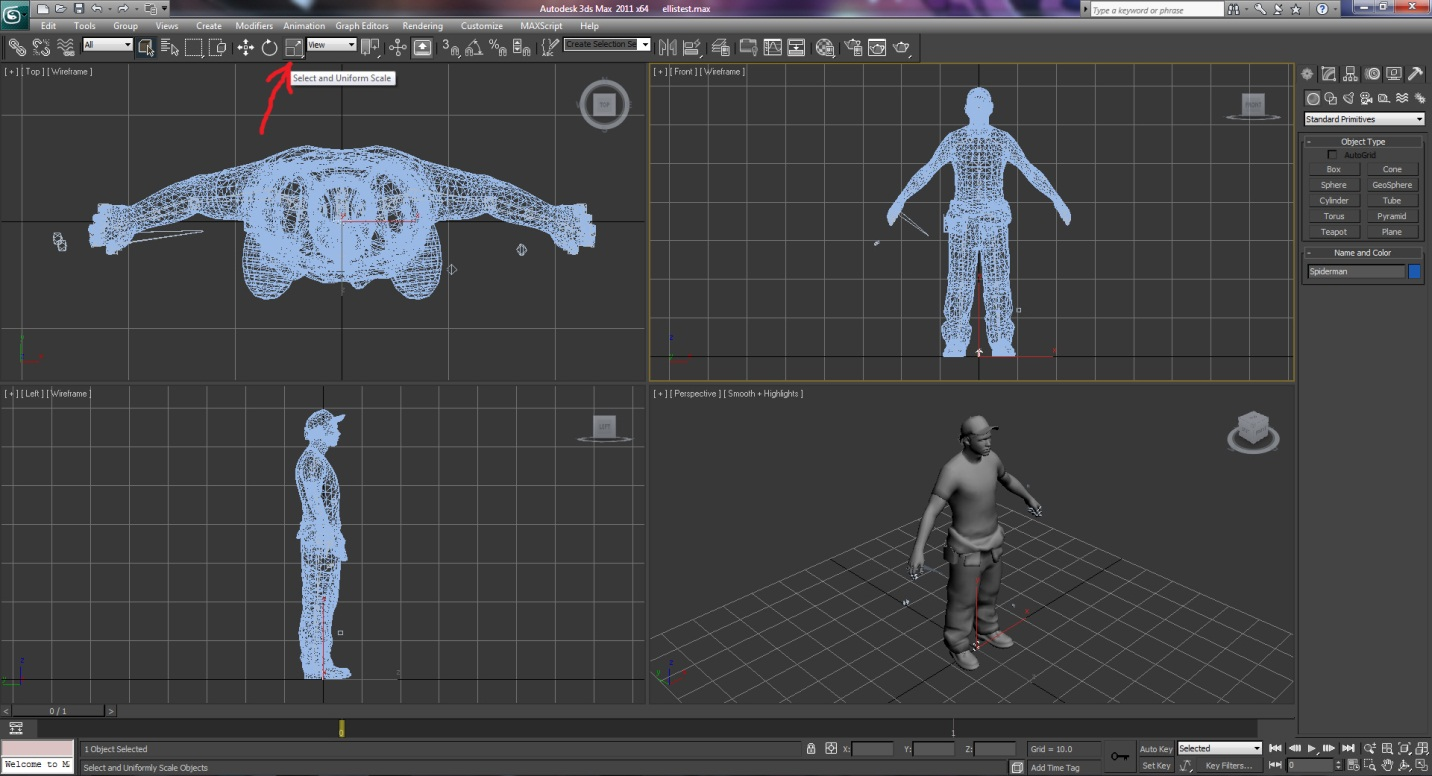
We need these models to line up as much as possible with one another. It’s clear at this point that they don’t, so we will need to do a little tweaking. Let’s start by scaling Spidey to the same size as Ellis. Click on the Select and Uniform Scale tool in 3dsmax:


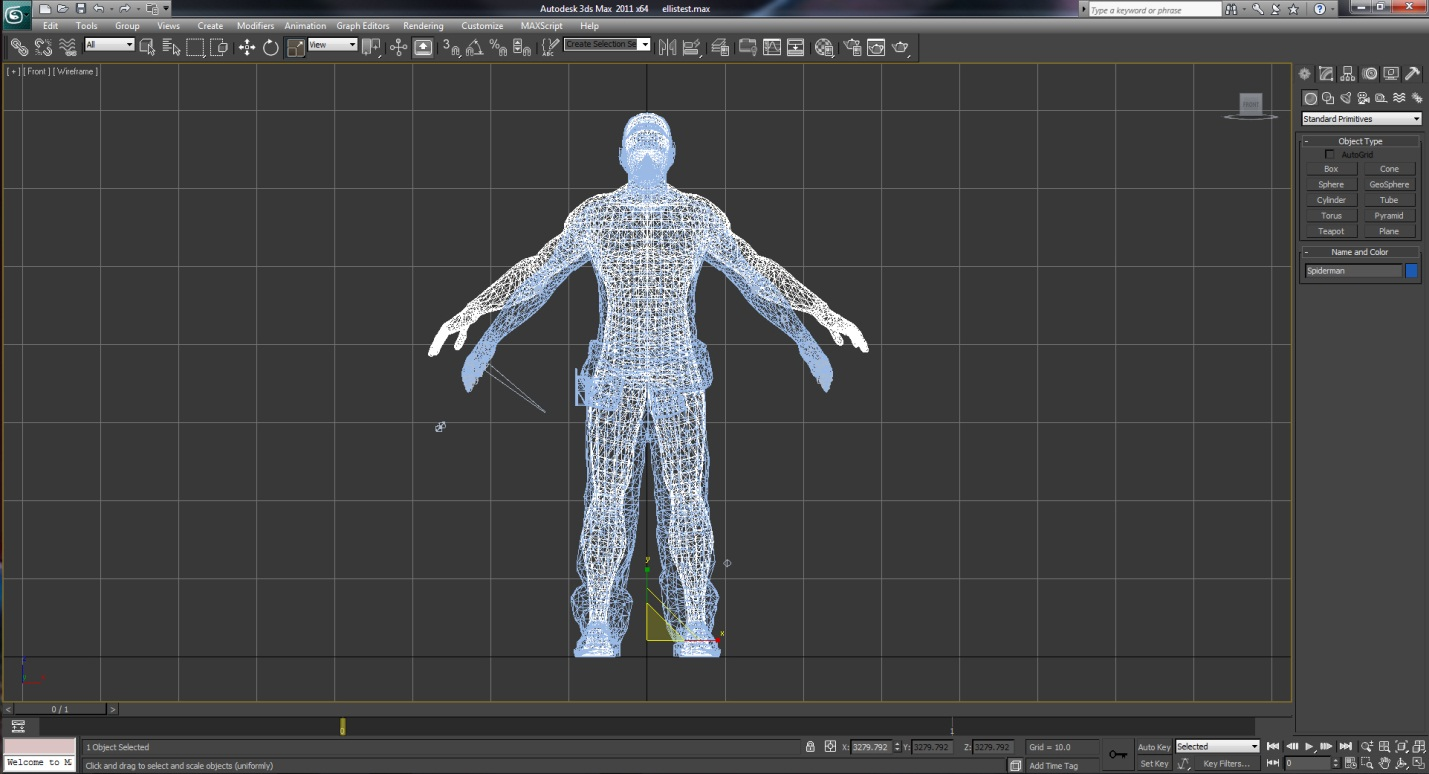
Now click on Spidey to select him(he should be the only object that turns white, indicating that he’s selected but Ellis is not, as shown in the pic). Now click and drag on the yellow region in the front view to scale Spidey up to Ellis’s size. Just make sure the tops of theirs heads and shoulders roughly line up. Release the mouse button when done. You will notice Spidey’s feet are a little lower than Ellis’s feet. We can’t have that. They need to be as close as possible. Just to the left of the scale tool you will find the Select and Move tool. Click on that then click and drag the up arrow in the front viewport to line up Spidey’s feet with Ellis’s feet. We see Spidey’s head and shoudlers are a little too high now, so go back to the scale tool and scale him down slightly. His feet should stay even with Ellis’s now too. Repeat this process until you’re satisfied that they line up good. You can hit the Z key to zoom in on the selected object and you can hit Alt+w to maximize the front view(hit it again to go back into quad view). You should end up with something like this:


That’s a good start, but we are going to need for them to match up even closer. Right click on spidey and click on Freeze Selection. He should turn gray or black now and you can no longer click on him. Don’t worry, that’s what we want to happen. This will make sure he doesn’t get in the way while we move Ellis around to match Spidey’s pose.
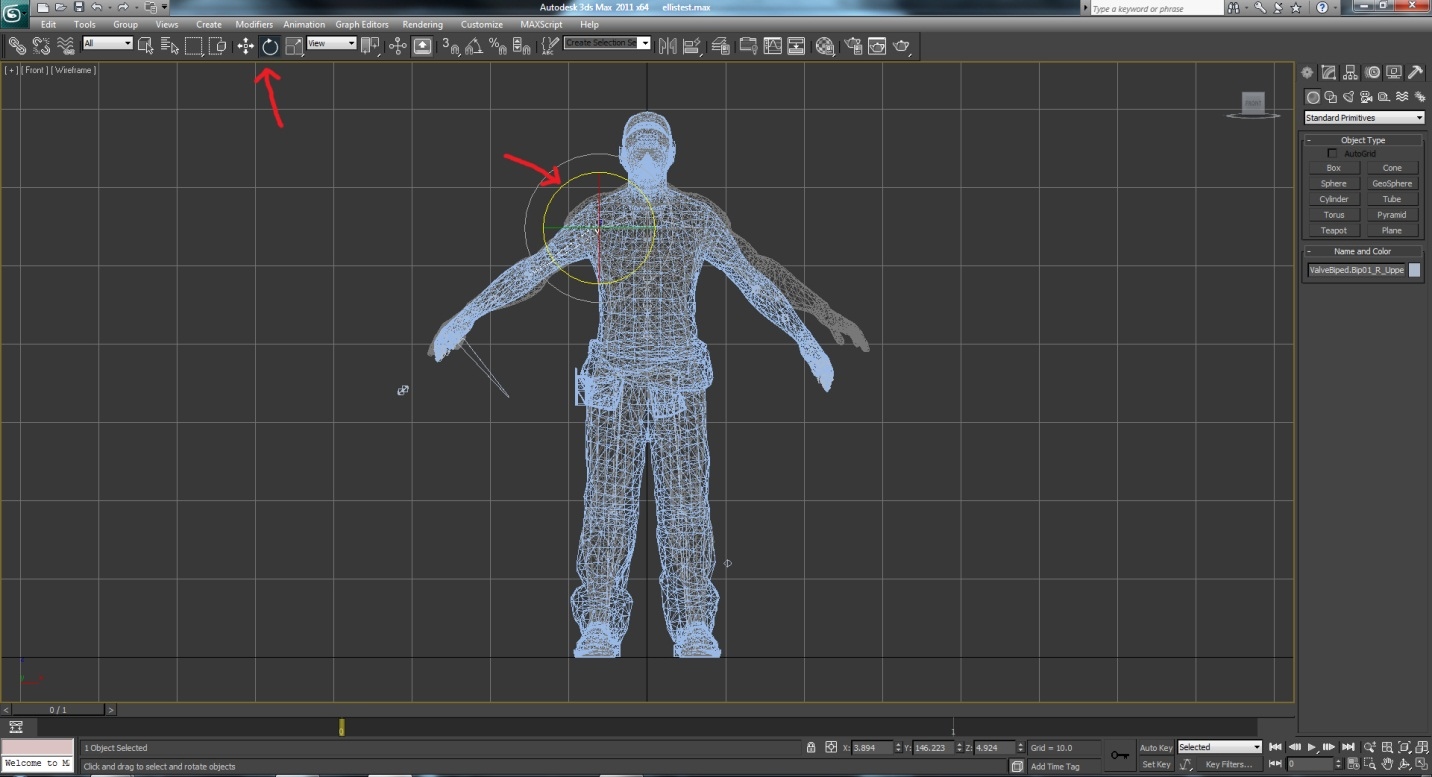
Between the move and scale tools is the Select and Rotate tool. Click on that. If you look closely at Ellis you can see he has “bones” running through him. These are what he uses to move in the game and what we’ll use to move him here as well. Position your cursor as best you can over the bone in Ellis upper right arm and click on it to select it. If it selects Ellis instead then click again and then it will usually select the bone. With the bone selected you will see the rotate tool become active. Click on the yellow circle to rotate Ellis’s arm in to the same position as Spidey’s as shown in the pic below:


You will want to do this in each view, and for each bone so that Ellis’s arms and legs match up as closely as possible with Spidey’s. Taking your time here will make things a lot easier for you down the road, so I recommend not getting in a hurry and really lining things up good in each view. You can click on the cube in the upper right of the viewports to spin Ellis around and see how everything is looking. You can hit Shift+W to open the basic pan and zoom view functions to get a better look at areas(hit it again to turn the tool wheel off). You can use F3 and F4 to turn shading and wireframe modes on and off to make things easier to see. As with everything this will get easier with practice so play around a little and learn your way around the controls; this is a great time to do that. Here is my finished up Spidey:


As you can see(hopefully) they line up pretty well. I spent about 8 minutes doing that. I’m not bragging, I’m just pointing out that you’ll get better with practice and will thus be able to do a half ass job(like me) in little to no time at all. Don’t forget to save your progress! *runs off to save file* We’re done lining up for now, and we’ve learned about the basic zoom, scale and rotate tools, as well and panning and zooming and some basic viewport functions…that’s a pretty good start. Right click in the viewport and click on Unfreeze All to release your Spidey model from limbo. Save your file. We’re ready to move on.
Adding Bone Weights
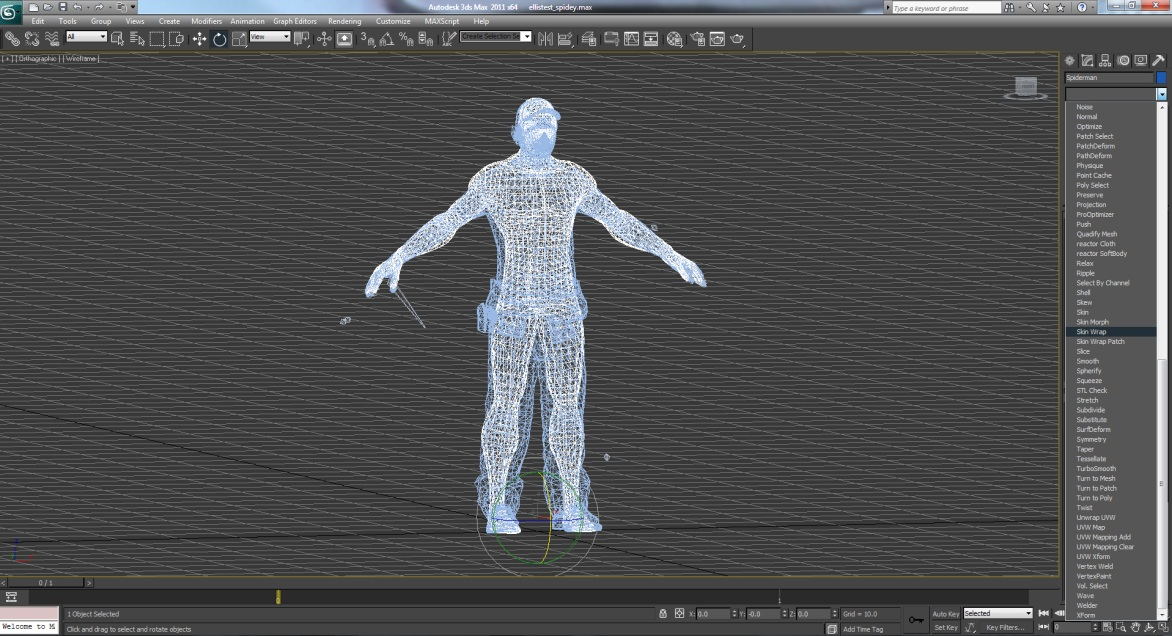
The next thing we want to do is add bone weights to our Spidey mesh. Bone weights are basically areas of influence around each bone. Let’s say you have a fire…the closer you are to the fire the hotter it feels, while the farther away you are the cooler it feels. Bone weights are much the same. The closer a mesh or point is to the bone that it’s weighted to, the more influence that bone has over it, and the redder that area will appear (we’ll see that in action shortly). Likewise the further a mesh or point is from the bone it’s weighted to the more blue, or cooler, it will appear. This also means that the more read an area is the stronger the influence the selected bone has over it. So if we were to click on Ellis’s right forearm bone we would see that his forearm area was red(because the bone moves the forearm) and his bicep or upper arm would be blue(because the forearm bone doesn’t control the upper arm, the upper arm bone does). Make sense? I hope so…I’m not so great at explaining things, but I do try. Anyhoo, what we’re going to do is use a shortcut to copy the bone weights on Ellis over to Spidey. This means (hopefully) that we won’t have to do much tweaking on Spidey’s bone weights, and this is also why we wanted them to line up so closely. The closer they line up the better this technique works and the less tweaking we will have to do afterwards, which is a good thing. We are going to use a modifier called Skin Wrap. In 3dsmax modifiers are used to make certain things easier to manage. They are controlled by the modifier stack over on the right hand side of the screen under the modify tab. Let’s click that tab now. Click on Spidey to select him and you should see “Editable Mesh” show up in the Modifier Panel. Just above that you will see a drop down menu that reads “Modifier List” so let’s click on that now…Scroll down the list until you see “Skin Wrap” and select that by clicking on it.


You should now see Skin Wrap show up in the Modifier Panel just above Editable Mesh. That’s what we want to happen so good. Just beneath those two you will see the Parameters panel, which is home to the various settings for the Skin Wrap Modifier. Towards the top of that, click on the Add button now. It will stay clicked and seemingly do nothing…it’s waiting for you to do the next step. In your viewport window you want to click on Ellis 1 time…SMDImport will show up in the window just above the Add button and the program will think for a moment. Now we will click the Add button again to de-activate it. We will then go down and check the “Weight All Points” check box. After that Click the Convert To Skin button just below and you should see something like this:


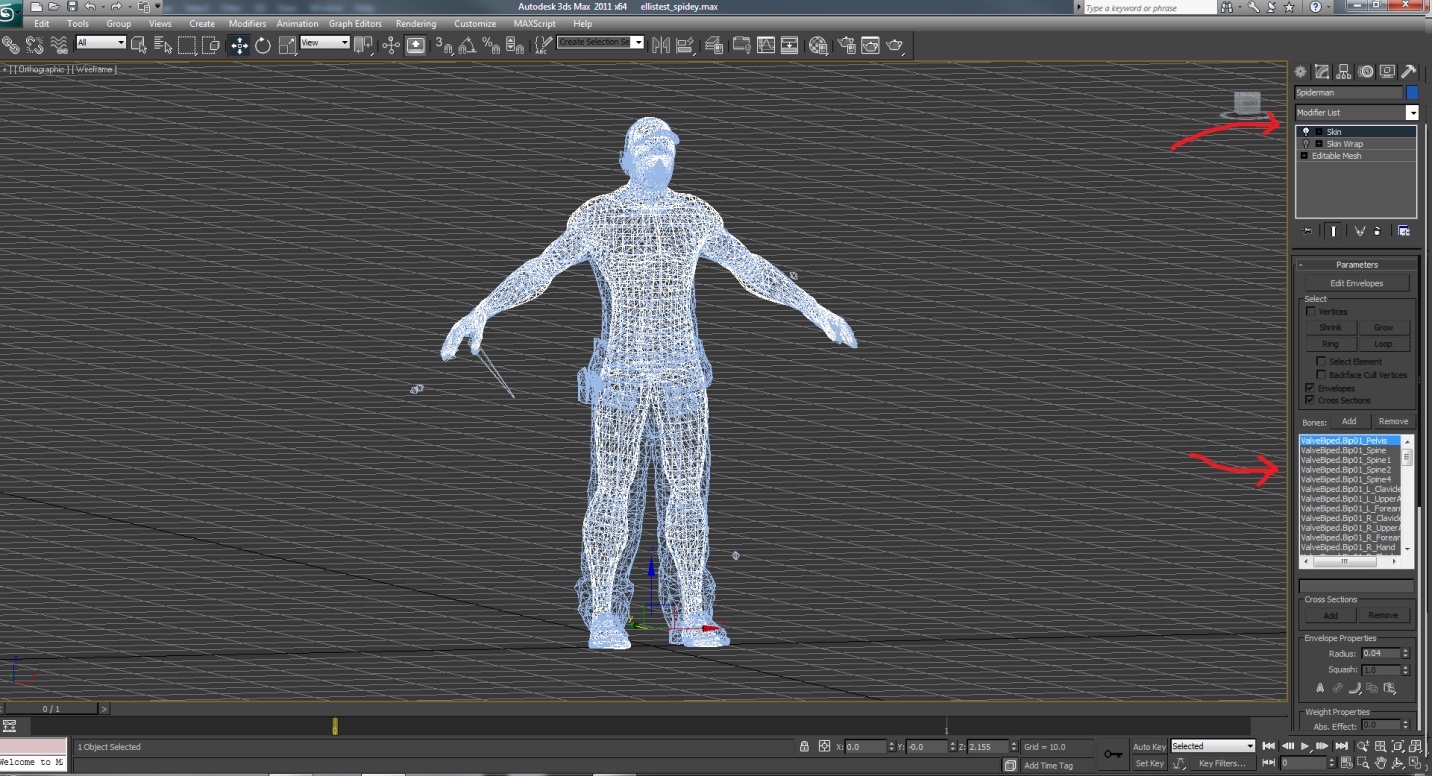
At the top of the Modifier stack you should now have a Skin Modifier and you should see all your bones in the lower panel. Outstanding! We’re almost there! Highlight the Skin Wrap modifier in the stack and delete it by clicking the the little trash can icon below. We’re done with that now so we’re getting rid of it. We should be left with just Editable Mesh and Skin in the stack. Perfect. Now in the viewport window click on Ellis so he is selected(remember white means he is the selected object). Once he is selected hit the Delete key on your keyboard. Now we have just Spidey but with all of Ellis’s bones and bone weights. This would be a great time to save your progress. Your screen should look something like this:


Now we basically have what we need, we just need to do a couple more things.
The "Macaw" Hand Fix
======
UPDATE: As of 31-Jan-2018, use Crowbar 0.54 to decompile any survivor from L4D2 with the $definebones option and there will be no need for this fix. Hooray!

Hello, again. ZeqMacaw here. Have you ever wondered why Splinks calls this section, The "Macaw" Hand Fix? Well, he named it after me because I was the first to publicly state how to get around this modding problem with the survivors. I call it the right-hand fix. See what the problem looks like for Bill over here[sites.google.com].
======

Seeing as how I’ve been such a ba5tard about making you go through problems then fix them, just this once I’m going to save you the trouble and tell you about one instead of making you experience it first hand. This problem is the infamous right hand problem. In a nutshell, if we were to export the model now, the right hand(the one that holds the weapons) would be screwed up looking. If you look at the right hand in 3dsmax you will immediately notice the huge bone coming out of it. This bone is the weapon bone and it’s the reason the hand gets screwed up. More specifically, the weapon bone isn’t placed right and that messes up the hand bone, which is connected to it. So, we need to fix the weapon bone so that it’s in the right position. That will, in turn, make sure the right hand looks right when we export the model and take it into the game. Let’s do that now.
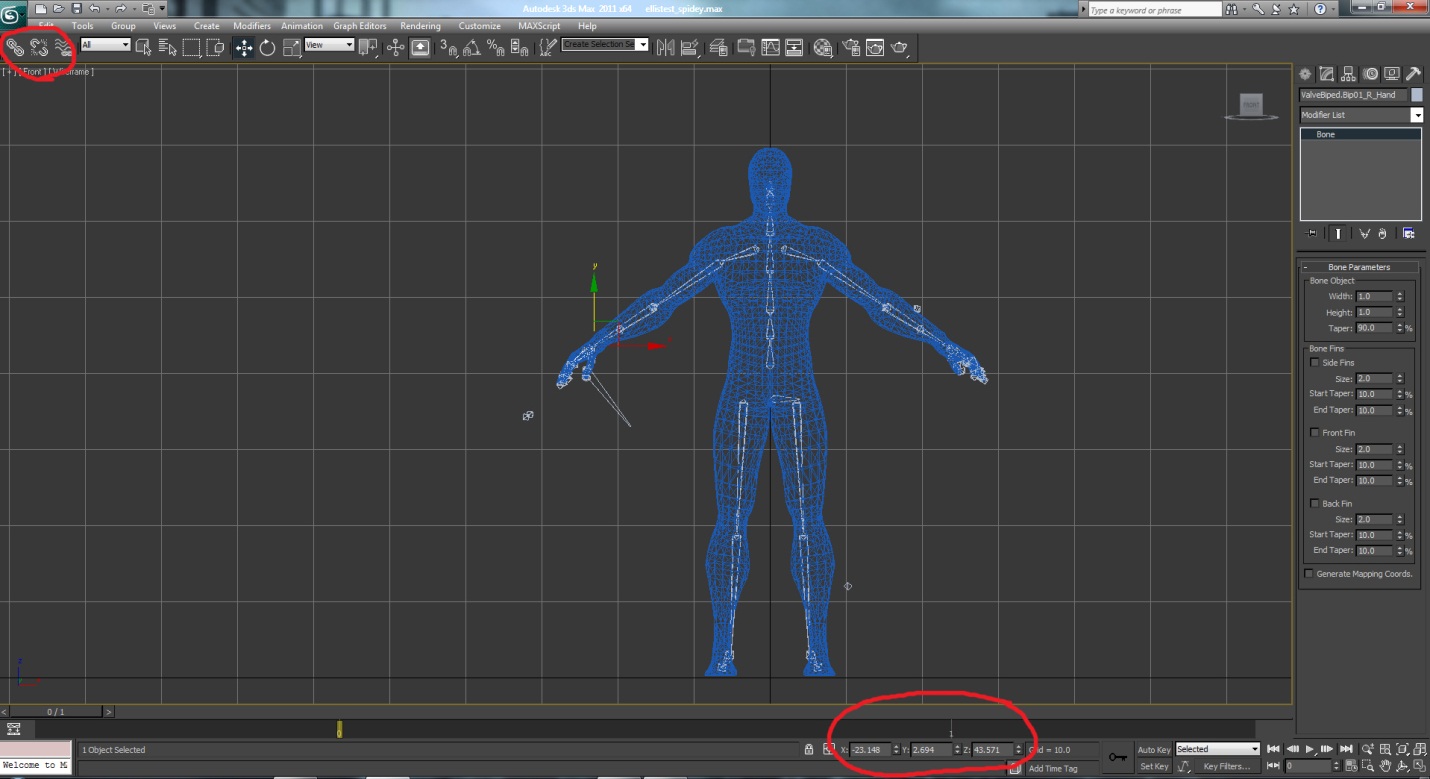
Click on the Select and Move tool again then select the right hand bone. You should see 3 numbers appear in the X Y Z boxes on the bottom of the interface now(see pic below). Write down those 3 numbers somewhere handy making sure to note which number goes to which axis. For example, X=-23.148. Once you have them all written down we’re going to now select the weapon bone. Once the weapon bone is selected we will click the Un Link Selection tool in the upper left of the 3dsmax interface(see pic below). After we do this, we first make sure the Select and Move tool is still activated and that the weapon bone is still selected. Next we enter the numbers we wrote down before into the appropriate boxes where we found them before. So we would enter -23.148 into the X box for example. The weapon bone should now be located right about where the forearm connects to the hand. Click on the spidey mesh to select it, then right click on it and select Hide Selection. Now in the upper left of 3dsmax, right next to the Un Link tool click on the Select and Link tool. We need to reconnect the weapon bone to the hand. With the tool activated, click and hold on the weapon bone then drag the cursor to the hand bone(you will see the 2 intersecting empty boxes icon-make sure you’re over the hand bone though). Now release the mouse button and the weapon bone should be re-attached to the hand bone. Click the Select and Move tool again to de-activate the link tool(better safe than sorry).
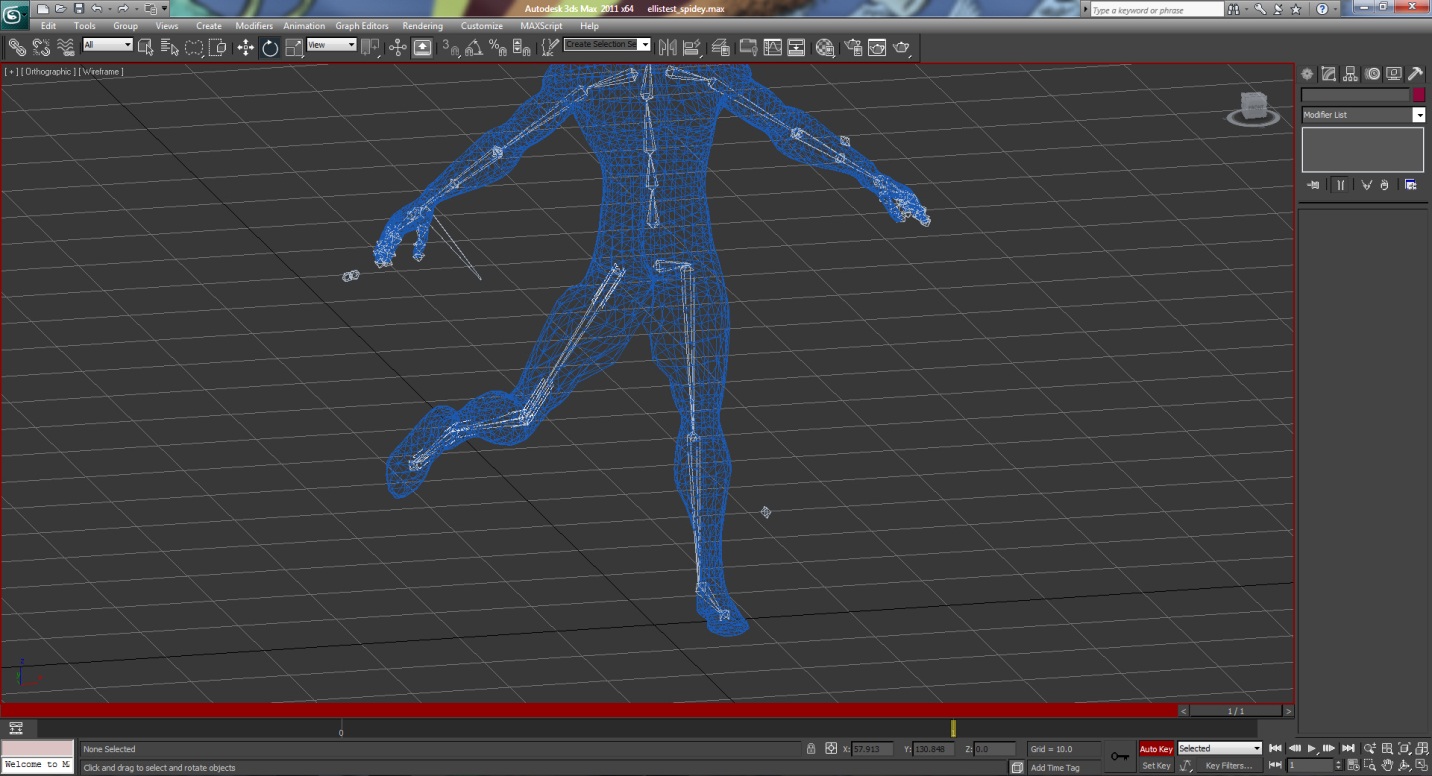


Now right click in the viewport and select the Unhide All option to make spidey reappear. Save your progress.
Tweaking the Bone Weights
Technically, at this point, we could just export the model and go and chances are it will mostly work. However, I feel it prudent to go ahead and show you how to check the weights and tweak them because, at the end of the day, it makes for better looking mods. So let’s work on that now…
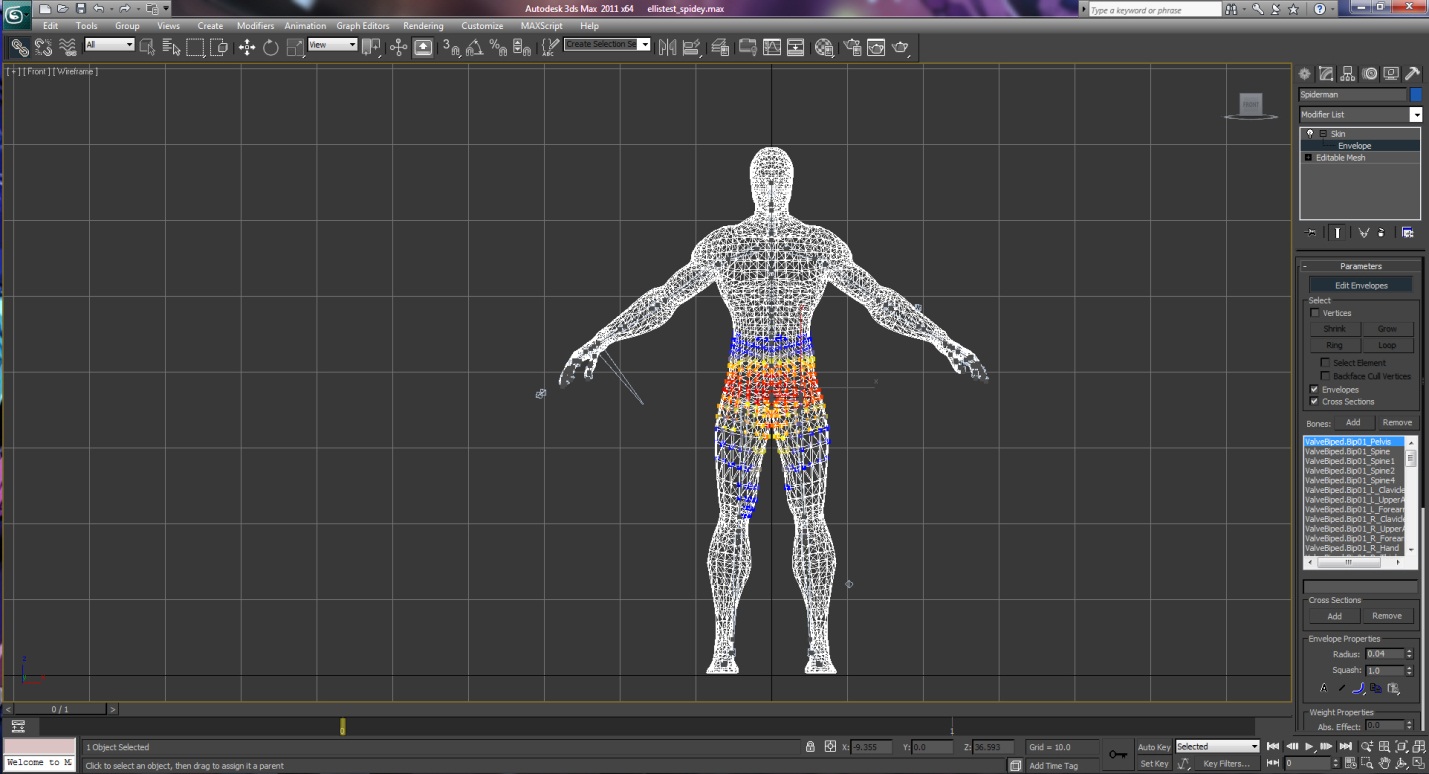
Click on spidey to select him and you should see skin and editable mesh again in the modifier tab on the right(same place we found it before). Click on the + next to Skin to expand it, then click on Envelope. You should see the pelvis of your model change colors to red, yellow, and blue. These are the bone weights we have been talking about, which is to say the area that the pelvis bone influences, with the colors representing how strongly the area is influenced by the bone. So the red(or hotter) areas are the most influenced while the blue(or cooler) areas are less influenced. You can see what mine is looking like below:


Notice that we have some blue areas going down towards the knees. We do not want this! Think about it…does your knee bend when you move your hips? No, it probably doesn’t. Well we don’t want that happening with our spidey either. These bone weights give us a visual representation of what parts each bone is moving so we can, in addition to controlling the character, see where the flaws are going to be(or where bone weights overlap so to speak).
There really isn’t a right or wrong way to fix this per se, just different methods of the same principle. I’m going to show you my method and as you learn and grow you may or may not decide to keep doing things this way…totally up to you. At any rate…what we want to do first is make a new frame to work in. This is largely just to keep things organized. I’ve found that generally l4d2 doesn’t care what pose the model gets exported in, but I like to maintain good happens by exporting them in the default pose as much as possible. By making a new frame, we can make all our tweaks and move stuff around without destroying our original default pose.
Towards the bottom of the 3dsmax interface, just to the right of where we entered our numbers before, you’ll see a button with a key on it. Next to that(on the right) you’ll see a button that reads “Auto Key” Let’s push that Auto Key button now-it should turn red. And your viewport should be highlighted red now too. If you look at the bottom left of your screen you will see a slider that says 0/1. Click that arrow next to it and it should move to the right to 1/1. We’re now in a new frame. If we move anything around here we can always go back to frame 0(our default pose) by using the slider. Cool, that’s exactly what we want. Pic below:


Now that we’re in our “work frame” it’s time to tweak some bones, starting with the pelvis. I’m going to walk you through the pelvis and the right leg, then I’m going to let you do the rest yourself. Don’t worry it all works the same way. If you can do the pelvis and leg you can do the rest. It just takes a little time and practice to get used to the process. Let’s begin…
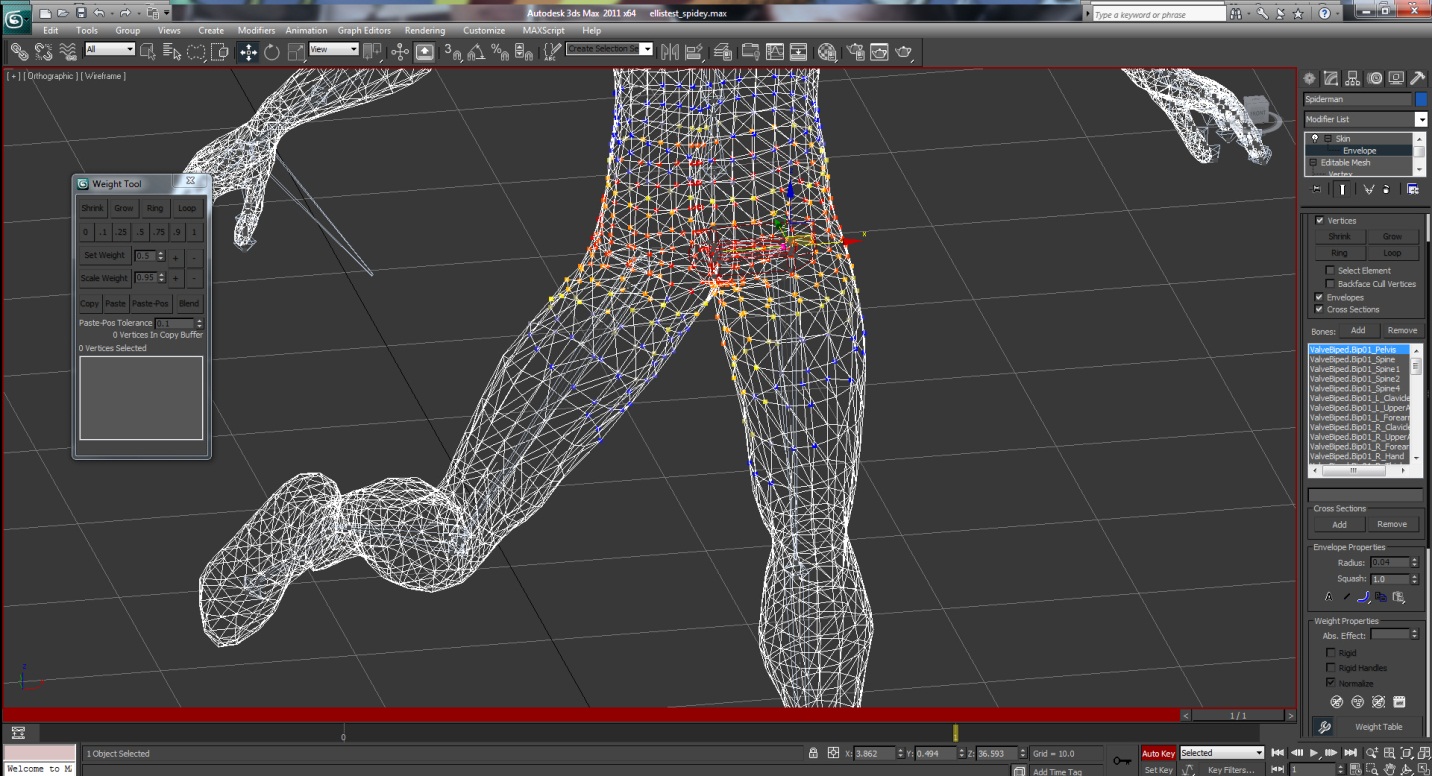
With Envelope selected in the modifier tab you should see Edit Envelopes in the Parameters below with your list of bones just below that. Selecting bones in this list will show you their area of influence(aka bone weights). Click a few to see that in action. When you’re done click on Pelvis again to show that bone’s weights. As we said the influence bleeds down into the knees and that’s not good so we need to fix that. In order to do that we will need to activate some bone weights tools. In the Parameters area, click the Vertices check box at top then scroll down until you see the little wrench under Weight Properties and click on that. Congrats you just activated the weight tool properly. Pic provided below. You will also notice an arrow in that pic pointing to the selection tool. Click and hold on that and select the lasso tool then release. Now we can lasso the stray points we need to modify, which is a good thing. We’re all set so let’s get to tweaking…For me, the easiest way to remove influence from an area is to assign those points to a different area. We’re going to do that to fix the pelvis.


First, select the stray points in the right thigh as shown below:


Now, in your bone list on the right scroll down and highlight ValveBiped.Bip01_R_Thigh to change to the right thigh bone. Back at the Weight Tool click on the number 1. Voila! Those stray points are now assigned to the thigh bone 100%. But notice that the thigh bone area of influence isn’t all 100%. On the Weight Tool panel you’ll also see a button called Blend. Let’s click that about 4-5 times now. You may or may not notice the weights blending as you do so. Scroll down the bone list and select ValveBiped.Bip01_R_Calf to activate the calf and click Blend a few more times. The blending changes in the points should be a lot more noticeable now. What we’re doing is literally blending the influence between the bones we’re clicking on. In this case, since the points go towards the knee we blend towards the calf. If the points were closer to the thigh we would blend with the pelvis bone instead. This part becomes a little more art than science. Go back and forth between the calf and thigh and blend things as best you can. Basically you just want to make things even. If you need to, you can select just certain points and blend those. Play around a little here a little bit and try to get a feel for it. This is a first attempt so it doesn’t have to be perfect though so bare that in mind. Once you’re satisfied meet me back here….Ok, let’s see how our tweaking worked out on the right thigh. Click on Skin again in the Modifier List to go back out of weight mode. Select the right thigh bone, the use the rotate tool to move it around a bit and see how it looks. Do the same with the right calf bone. Here’s a pic of me doing that:


As you can see, we still have some problems around the thigh and knee and we still have some influence over the left thigh, which we do not want. To fix the left thigh we do exactly as we did before. Click on Envelope, then with the lasso tool select the points in the left thigh that are being pulled on by the right thigh. Now select the left thigh in the bone list and assign those points to the left thigh. You should see the results on screen immediately. You can likewise tweak the points on the right thigh so they move with the bone better. Play around until you’re satisfied with your results. In the end everything should look smoother and more natural like this:


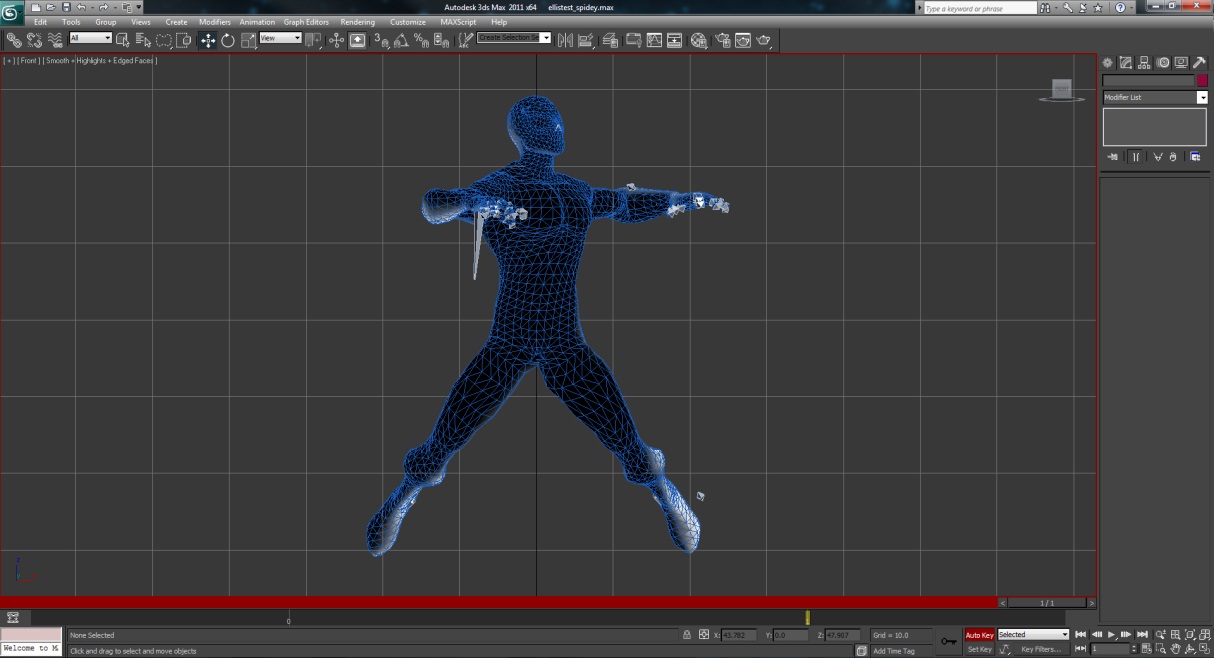
That’s much better. Now for the crappy part(not really, this is actually my favorite part believe it or not)… repeat this process on every major bone in the model. Well, at the very least in all the areas where you see problems. Go back into regular mode by click on Skin in the Modifier List and use the rotate tool to move the various bones around. This way you can see what areas are needing work and which areas are ok. Go through and tweak as we just did until everything moves fairly smoothly. Again, we’re not after perfection just yet. Just learning to use the tools and get something half way decent is all. Meet me back here when you’re done and we’ll continue. PROTIP: the hands and fingers are where you’re going to have the most problems in most cases. As a reminder, the closer you match everything to Ellis back at the start, the less you tweaks you will have to make here. Just take your time and be patient. You’ll get it! You can see my Derpish pose here(lol):

Exporting (finally!)
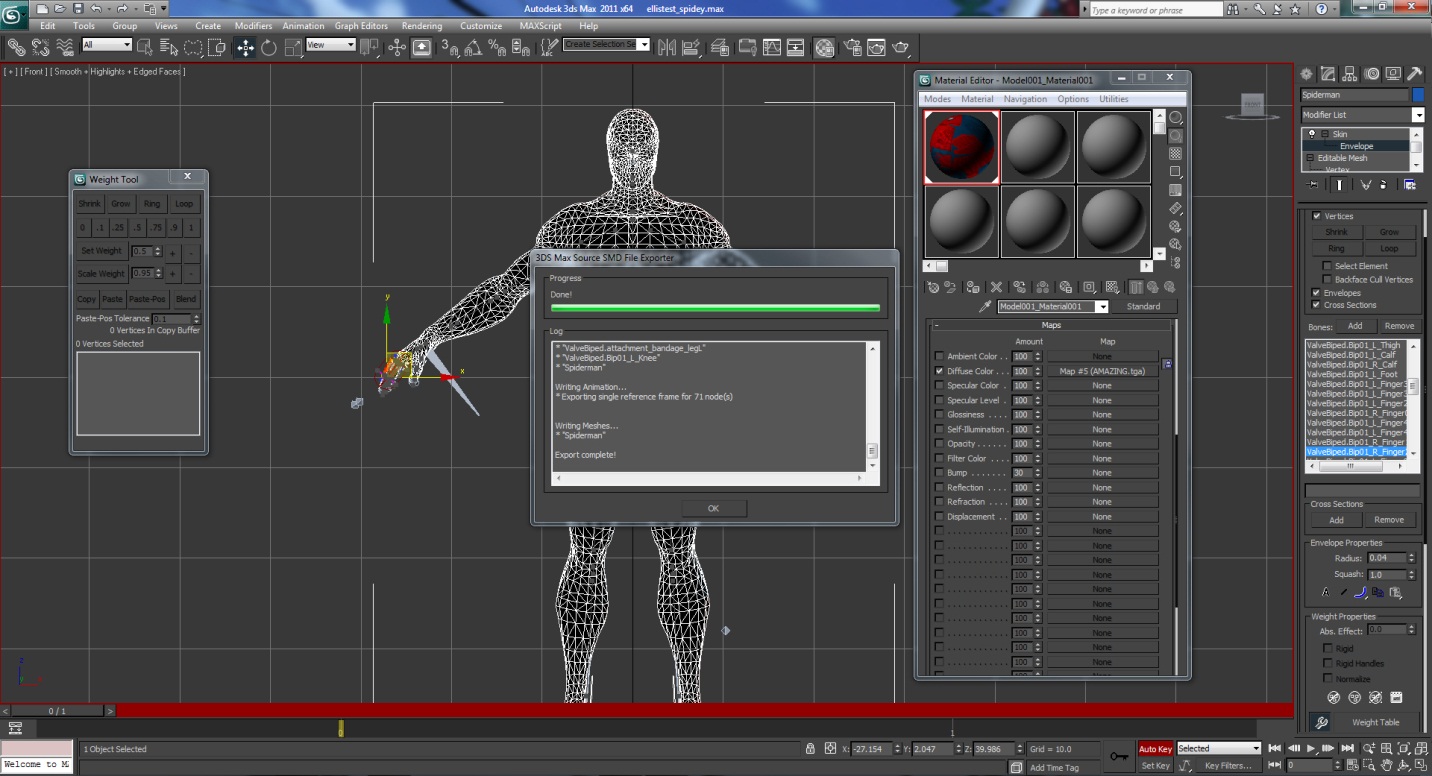
Now that we have all our bone weights how we like them, it’s FINALLY time to export the model. OMFG!!! FINALLY!!!! So first make sure we’re out of bone weight mode by clicking on Skin in the Modifier List then let’s go back to frame 0 using the slider at the bottom of the screen. Your spidey should fall back into his default pose. Yay! Click the green button->Export and the export dialogue opens up. From the Save as type drop down menu on the bottom of it, select Source SMD(*.SMD) as your type and then give it a catch filename like Ellis_spidey.SMD and click Save. The SMD Exporter options box will open. Generally you won’t have to click anything here so just click OK. NOTE: If you model doesn’t look smooth in game, then when you export you should check the “Use explicit normal method” checkbox on the SMD export options to fix that. At this point, the export finished but I got a warning about the texture using an empty material name. Somehwere along the line I messed up the texture we fixed earlier. So open material editor and fix it exactly as we did earlier, then export again. This time I get no errors or warnings. Perfect!


Well, after a LOT of learning and tweaking we just got our new model converted to SMD. That means we’re 75% done at this point. Now all we need to do is the compile related stuff. So save your work and exit 3dsmax.
Preparing to Compile the MDL file
We’re almost there(whew!) but we still have a bit more grunt work to do first. Remember that decompile folder had way back at the start? Let’s go back there now. Right click on survivor_mechanic.qc and select Edit with Notepad++ to open it.

Line 5 specifies the smd names and such…ours should read:
$Model "ellis_spidey" "ellis_spidey.smd" {

Technically you could leave the first part as “Mechanic” but again, I like to keep things organized and reasonably consistent so just humor me and change it as indicated above.

Lines 6-243 are extra model info such as face animations. Delete these lines. Lines 5-6 should look like this:
$Model "Mechanic" "survivor_mechanic_reference.smd" {
}

Lines 8-20 are the lod model info code (remember we talked briefly about the lod models when we decompiled). Later on, should you choose to include them this is where the info would go. Since we are not using them now, we are going to delete these lines. Line 8 should now be:
$SurfaceProp "flesh"

Move down to line 22 and change it to read: $cdmaterials "models\survivors\spidey\"

Again, you could just leave this alone, but we’re trying to be consistent here so we’re going to go ahead and change ours to match all our other naming conventions. Also, this would be handy should you ever want to compile spidey into a non-l4d2 model or just a unique l4d2 model(nothing we’ll be dealing with right now just take my word for it that it can be useful to do things this way).

If we continue down to around line 26 we should see $texturegroup skinfamilies then below that 2 brackets followed by some texture names. We want to insert our texture names here. So ours should read:

$texturegroup skinfamilies
{
{ "AMAZING.vmt" }
{ "AMAZING.vmt" }
}

Now I realize our filename ends in .TGA not .VMT, but don’t worry, we’re going to fix that later. The compiler will only really accept the VMT files as a parameter so we’re just planning ahead.

The first set are the regular textures and the second set are the textures for when you’re boomed and covered in ♥♥♥♥. We’re not bothering to change the 2nd set but you can later on if you want to learn about that(it’s a little beyond the basics we’re teaching here). Also back on line 4 you could technically include code for eye posing, facial anims, etc. but again, that’s a bit beyond what we’re trying to accomplish here right now, which is just to get your started.

Ok, so scroll way down the lines 146 and change them to read:
$Sequence "ellis_spidey" {
"ellis_spidey"
fadein 0.2
fadeout 0.2
fps 30
}

Save the file as Spidey.qc and exit the program. We’re all done with the compile sheet. Note that this is pretty much how you’ll edit the qc every time, the only difference being you’ll use a different smd name and different texture map names. But otherwise this sheet is interchangeable for all your future Ellis mods.
Compiling
======
ZeqMacaw here, yet again. Instead of the nonsense we modders had to go through to use GUIStudioMDL, we can now use a brilliant tool called Crowbar. Again, no details on how to use it here, but if you really want some help on it, here is the link to the main Crowbar guide: http://steamcommunity.com/sharedfiles/filedetails/?id=791755353

In short:
Open Crowbar. Select the QC you modified. Select L4D2 game. Click Compile button.
======
Preparing the Textures
So we have almost everything we need now to make our new VPK mod file. We just need to fix the Maps first. Luckily we only have 1 to deal with so that makes things a LOT easier. Back in our survivor_ellis folder let’s go into the materials->models->survivors and make a new folder called spidey.

Now let’s copy our AMAZING.tga and norm_null.TGA files to our new spidey folder. Now let us go back a couple folders to materials->models->survivors->mechanic and copy mechanic_body_color.vmt to our spidey folder as well. So far so good time to hang out with an old friend again…right click on the VMT file and Edit in Notepad++ as before.

On line 3 change it to our texture map “models/survivors/spidey/AMAZING”

On line 4 change it to our normal map “models/survivors/spidey/norm_null”

Leave everything else alone for now and save the file and exit.

Note you can tweak many many settings in the vmt to affect how textures appear in the game. That’s another more advanced topic for another time but just keep it in the back of your head for future reference.

Now we just need to make those TGA files into VTF files because that’s what l4d2 likes to use. To do this we need a program called VTFEdit which you can get here: http://nemesis.thewavelength.net/files/files/vtfedit125-11.exe

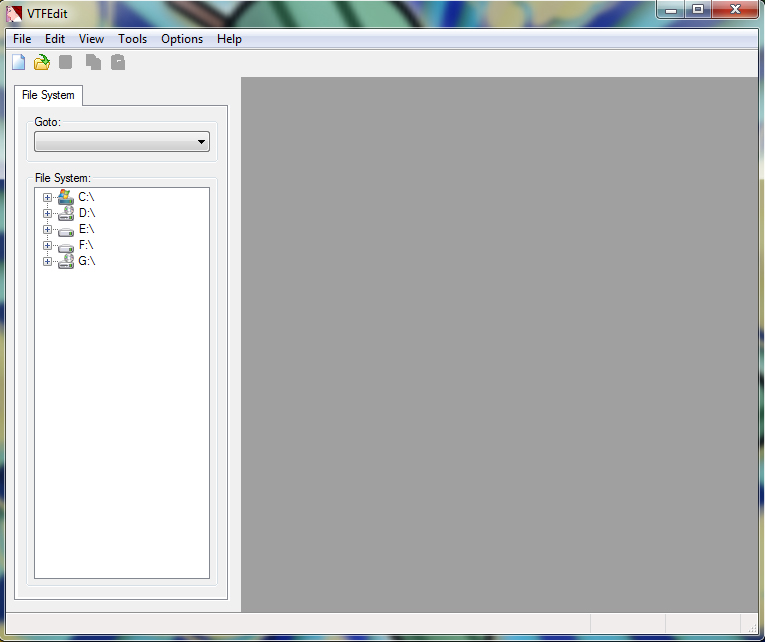
After you download and install it let’s start it up and see what happens.


Yay! No problems for once! Let’s fix those maps then. Go to Tools->Convert Folder and browse to your spidey texture folder(just choose the same folder for output). Make sure To VTF is checks and *.tga is in the box next to it and hit Convert.


Oh how we have grown to love it when things work right the first time. Now back in our spidey texture folder we should see AMAZING.VTF and norm_null.VTF.Erase norm_null.tga, norm_null.vmt, AMAZING.tga and AMAZING.vmt. Now rename mechanic_body_color.vmt tp AMAZING.vmt. Our textures are now good to go. Finally something easy. Lol!
Cleaning Up
At this point we have some things we no longer need in our survivor_ellis folder. Let’s clean it up a bit. In the materials folder let’s get rid of the mechanic folder(keep a backup somewhere of course). Then in the models folder, let’s remove the decompile folder as well as the other files here(everything in other words but again, make sure to have a backup). Our new textures are already fixed and in place so now we just need to get the MDL files we compiled and put them in their proper place too. You will find them in this folder:

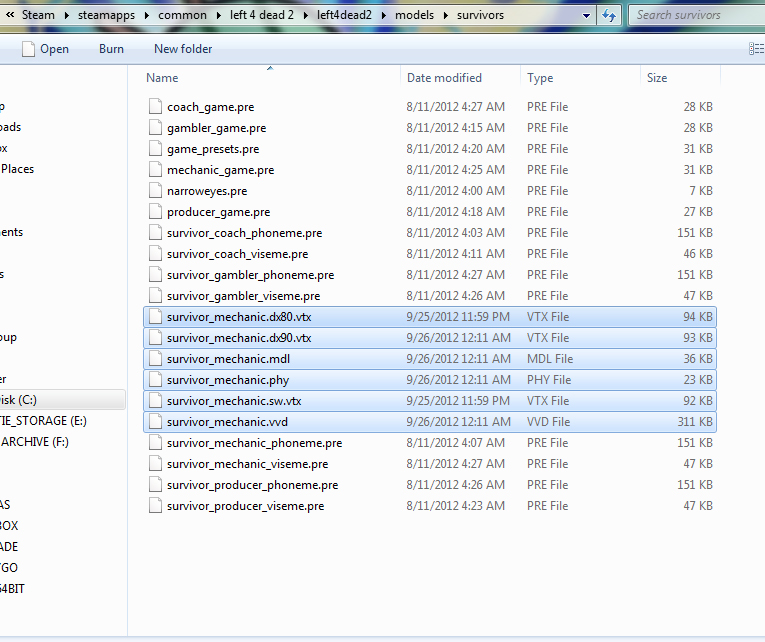
C:\Program Files\Steam\steamapps\common\left 4 dead 2\left4dead2\models\survivors

You want the files you see highlighted below:


Copy those files to your model folder at:
survivor_ellis\models\survivors\

Now we just need to drop an addoninfo.txt in the root. It looks something like this:
"AddonInfo" { addontitle "Spidey" addonversion "1" addontagline "Friendly Neighborhood Spidey" addonauthor "YOUR_NAME_HERE" addonSteamGroupName "GROUP_NAME_HERE" addonauthorSteamID "YOUR_STEAM_NAME_HERE" ddonContent_Campaign 1 addonURL0 "WEBSITE_TO_YOUR_MODS" addonDescription "Quick Spidey mod fo teaching folks stuff and junk" addonContent_Script 0 addonContent_Music 0 addonContent_Sound 0 addonContent_prop 0 //This Add-on provides new props, addonContent_Prefab 0 //Provides new prefabs addonContent_BackgroundMovie 0 //Provides a replacement for the background movie. addonContent_Survivor "Ellis" //Provides a new survivor model. 0=false, 1=true, String in quotes if replaces specific single character, i.e. "Francis" addonContent_BossInfected 0 //Provides a new boss infected model. Break these out? addonContent_CommonInfected 0 //Provides a new common infected model addonContent_WeaponModel 0 //Provides a new appearance to existing weapons, but does not change their function addonContent_weapon 0 //provides new weapons or new zombie killing functionality, i.e. guns, explosives, booby traps, hot tar, addonContent_Skin 0 //0 if no new skin textures for existing models. 1 if multiple skin pack. String in quotes if specific single skin addonContent_Spray 0 //Provides new sprays. addonContent_Map 0 //Add-on provides a standalone map }

Save that txt file in the same place that the models and materials folders are located.

Now everything is in place. And we have only the stuff we need left. Perfect. Moving on.
Making the VPK
We’re finally ready to build and test out first mod. Hard to believe but here we are. So, let ‘s browse to the folder: C:\Program Files\Steam\steamapps\common\left 4 dead 2\bin and locate the file vpk.exe.

Right click on vpk.exe and send to desktop as a shortcut. Now drag your entire survivor_ellis folder onto vpk.exe and let it work its magic. A few seconds later you should be greeted with survivor_ellis.vpk. Giggidy! Let’s test it out. Browse to your l4d2 addons folder located here:

C:\Program Files\Steam\steamapps\common\left 4 dead 2\left4dead2\addons

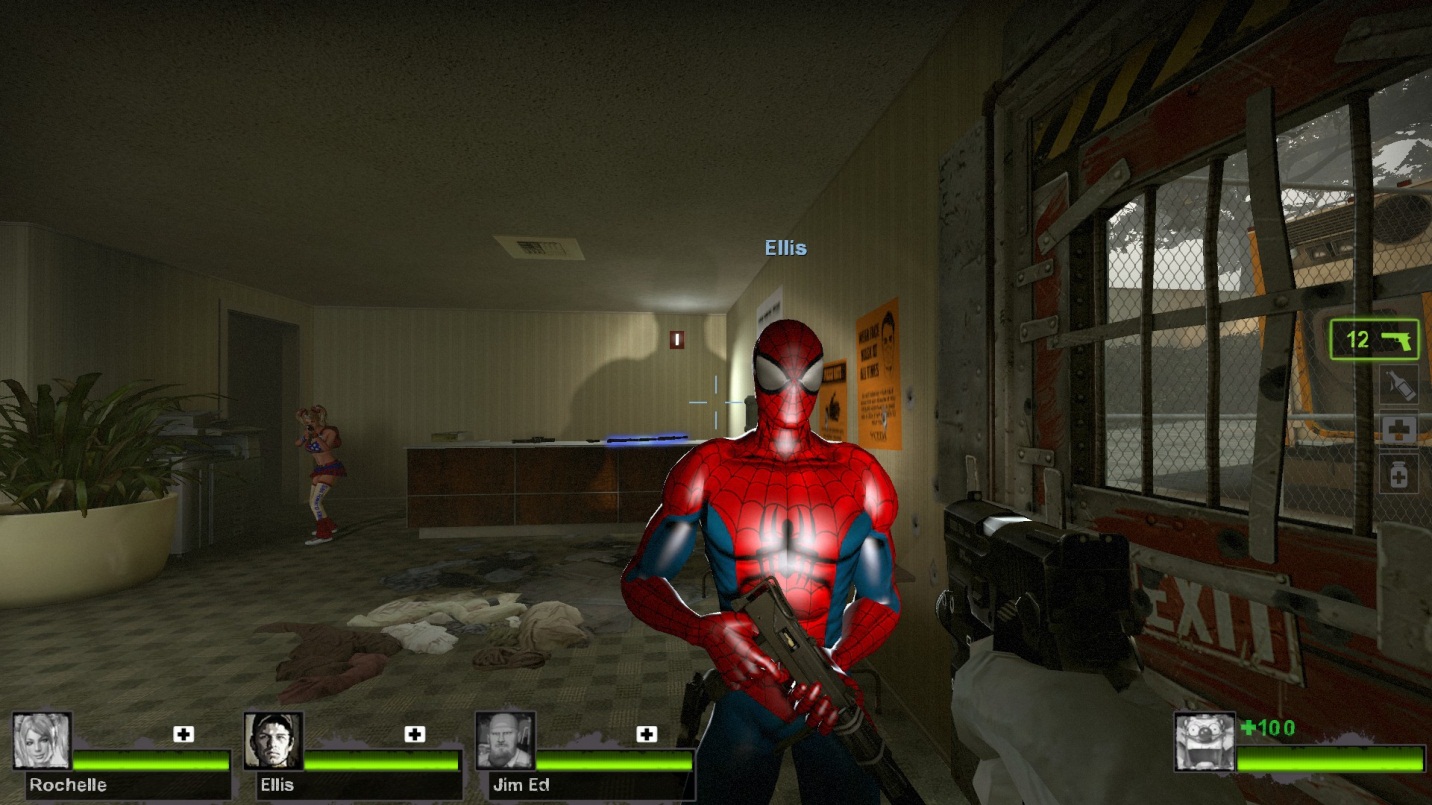
Copy your vpk into this folder-voila! You just installed it. Make sure there are no other mods in there that might conflict with it(like another ellis mod or something) and if all looks well start up your game. Load any random map you like…I usually open console and type map c1m2_streets and just use that but by all means use whatever area you like to test with. If all the stars aligned you should see this:


VICTORRYYY!!!!!!!!!!!!!! MOTHERF(*&^ING DOUGHNUT TIME!!!!!!!!!!!!!!!!!!!!!!!!!!
A Few Last Words
"I’d like to send a special shout out to da1barker-the man who started it all for me. He took the time to teach me how to do this when he didn’t know me and had no reason to, and I’ve never forgotten that. Thanks man! You inspired me!"
    -MrLanky


"To the man that helped and guided me when I seemed to be hitting every wall as I started out, I would like to give my thanks to MrLanky. You have been more then a help for what I do and I'm glad that I'm able to call you my friend. Thank you."
    -Splinks
Q/A
For any questions you may have feel free to leave in the comment section below
or visit the chat room over at Dead 4 Mods.
    If you’re sincerely trying to learn, we will help you. There are others who will as well I’m sure. We have a lot of very talented modders around these parts and many of them know a lot about this stuff. So make friends, be polite, and I’m sure someone will help you out.

If this tutorial helped out please give a shout out so we can spread this useful tool for those looking to start off as well.
393 Comments
Doge May 3 @ 9:10am 
Thanks bro :pickax: :nitra::goldvein:
MOTHERCOCONUTS Feb 1 @ 3:35am 
Noted! Thanks :)
Splinks  [author] Jan 31 @ 7:40pm 
@MOTHERCOCONUTS Pretty much. Special infected are actually a tad easier but do require a bit more info in the QC like $hbox data. but as long as you're just decompiling the mdl and using the qc from the decompile or one of the starter kits from the SDK then you should be just fine.
MOTHERCOCONUTS Jan 31 @ 4:23am 
Is the process the same for infected models like Tank?
Anti-HyperLink Jul 29, 2023 @ 12:00pm 
You said "All 5 files," but only selected 4.
Harry May 10, 2023 @ 2:36pm 
Alright, I have a question. I seem to have forgotten to add a shadow on my model and I'm not sure how to add it in. How do I go about doing that?
Debiddo Mar 16, 2023 @ 11:11am 
@✪ Garon technically applies to all Source games, but $includemodel and Armature / Skeleton behave slightly different game to game.
Debiddo Mar 16, 2023 @ 11:11am 
@Shiro "Shiny" is a byproduct of incorrect $envmap texture, too much $envmaptint , too strong $phongboost or unreasonable values for $phongfresnelranges vectors.
In case for Toon-like or Anime like models, I've been working to overcome the HDR Over-exposure for then for a long time.
The current version template is placed here for VertexLitGeneric [github.com]
✪ Garon Mar 14, 2023 @ 4:13am 
Thank you for your explanation.

Additionally, can it be applied to CSGO games in the same way?
Shiro Mar 7, 2023 @ 8:00am 
How do I avoid the survivor textures from being Shiny in high quality settings?